
Paramify is built to be flexible, supporting the Model Context Protocol (MCP) to bridge the gap between your security data and AI. This guide provides a walkthrough of how Paramify integrates with MCP, allowing you to bring the power of your preferred LLM—whether it’s Claude, OpenAI, or a local model—directly into your compliance workflow. Follow the examples below to configure your environment and start querying your Paramify data with ease.
Before setting up the Paramify MCP server using your desired method, navigate to the workspace settings within Paramify. Under the Integrations option on the left hand sidebar, toggle on the MCP Server.
Claude Desktop
Before setting up Paramify MCP on Claude Desktop, create an API token in the Paramify
workspace settings and enable MCP Server in Paramify settings.
- Open Claude Desktop
- Open Claude > Settings on the top Application menu bar next to the Apple icon in the
top left corner
3. Click on "Developer" at the bottom of the Settings list.
4. You should now see Local MCP servers
5. Click on "Edit Config"
6. Open the claude_desktop_config.json file in a text/code editor. It should be at the
following path: /Users/<USERNAME>/Library/Application
Support/Claude/claude_desktop_config.json
7. Set the JSON to the following*. Be sure to add your API token from Paramify after
"Bearer This config tells Claude Desktop to connect to the Paramify MCP server using
npx to run the mcp-remote command, with authentication via an API Bearer token; npx is
a tool that runs Node.js packages without needing to install them globally.
{
  "mcpServers": {
    "paramify": {
      "command": "npx",
      "args": [
        "mcp-remote",
        "https://app.paramify.com/mcp/paramify",
        "--header",
         "Authorization: Bearer <insert your API token

here e.g.:FSs13jka1l2jdnnaldjsbalwjbfla>"
          ]
        }
    }
 }
8. Save the claude_desktop_config.json file
9. Restart the Claude Desktop Application
10. You should now see the Paramify MCP server in Settings > Developer and in the
"Search and Tools" prompt option.
11. Prompt Claude and ask it to use the paramify MCP tools. For example: "Using the
Paramify MCP server, what programs do I have?"
12. As Claude interacts with Paramify MCP it will ask for your approval (Allow Once / Allow
Always).
Bonus: Try answering a security questionnaire! Upload a csv with security questions and prompt
Claude: "Please answer these security questions using the appropriate content in risk solutions
that are applicable. Please answer directly in line in the csv file. Use the Paramify MCP server."
Troubleshooting:
- if you see a spawn npm ENOENT error, you may not have npx installed. This can be
installed via the command line: brew install node.
Cursor - AI Code Editor
Before setting up Paramify MCP in Cursor, create an API token in the Paramify workspace
settings and enable MCP Server in Paramify settings.
- Open Cursor
- Click the Settings Gear button in the top right corner.
- Select MCP Tools in the Settings list
4. Click “New MCP Server”
5. Edit the mcp.json file to the following. Be sure to add your API token from Paramify after
"bearer
{
  "mcpServers": {
    "paramify": {
      "url": "https://app.paramify.com/mcp/paramify",
      "headers": {
        "Authorization": "bearer <insert your API token here

    e.g.:FSs13jka1l2jdnnaldjsbalwjbfla>"
          }
        }
      }
    }
6. Restart the Cursor Application if needed.
7. You should now see the Paramify MCP server tools enabled in Settings > MCP Tools
13. Prompt Cursor in a Chat and ask it to use the Paramify MCP tools. For example: "Using
the Paramify MCP server, what programs do I have?"
14. As Cursor interacts with Paramify MCP it will ask for your approval.
Bonus: Try answering a security questionnaire! Upload a csv with security questions and prompt
Cursor: "Please answer these security questions using the appropriate content in risk solutions
that are applicable. Please answer directly in line in the csv file. Use the Paramify MCP server."
Troubleshooting:
Notes:
ChatGPT (Only available for paid plans)
Note: Accounts must be in “developer mode” for the MCP server to be accessible. Turn on
developer mode from any paid account by going to Settings > Apps & Connectors > Advanced
Settings > Developer Mode.
In ChatGPT, MCP servers are accessed via connectors. This guide will demonstrate how to
create a connector that is connected to the Paramify MCP server.
- Start creating the connector to the Paramify MCP server by navigating to Settings >
Apps > Create app
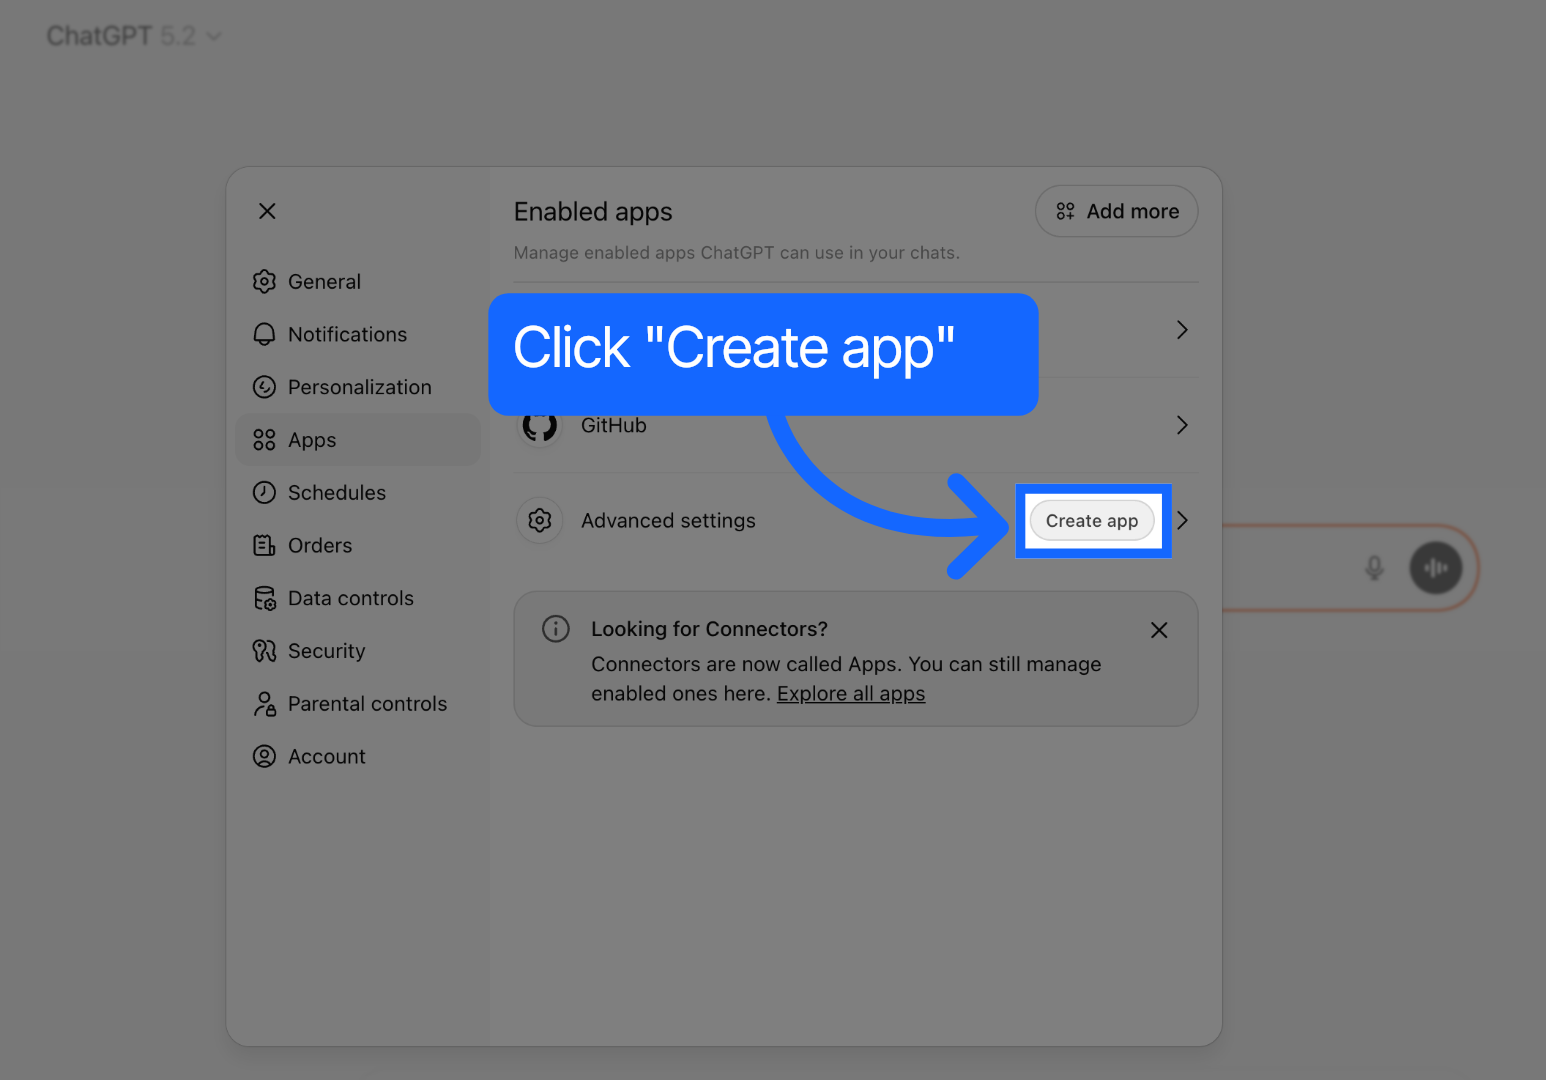
2. Input a name for the connector, an optional description, and the Paramify MCP URL
(https://app.paramify.com/mcp/paramify).
3. Add the Client ID and secret.
4. Select the checkbox to trust the application, and then click Create.
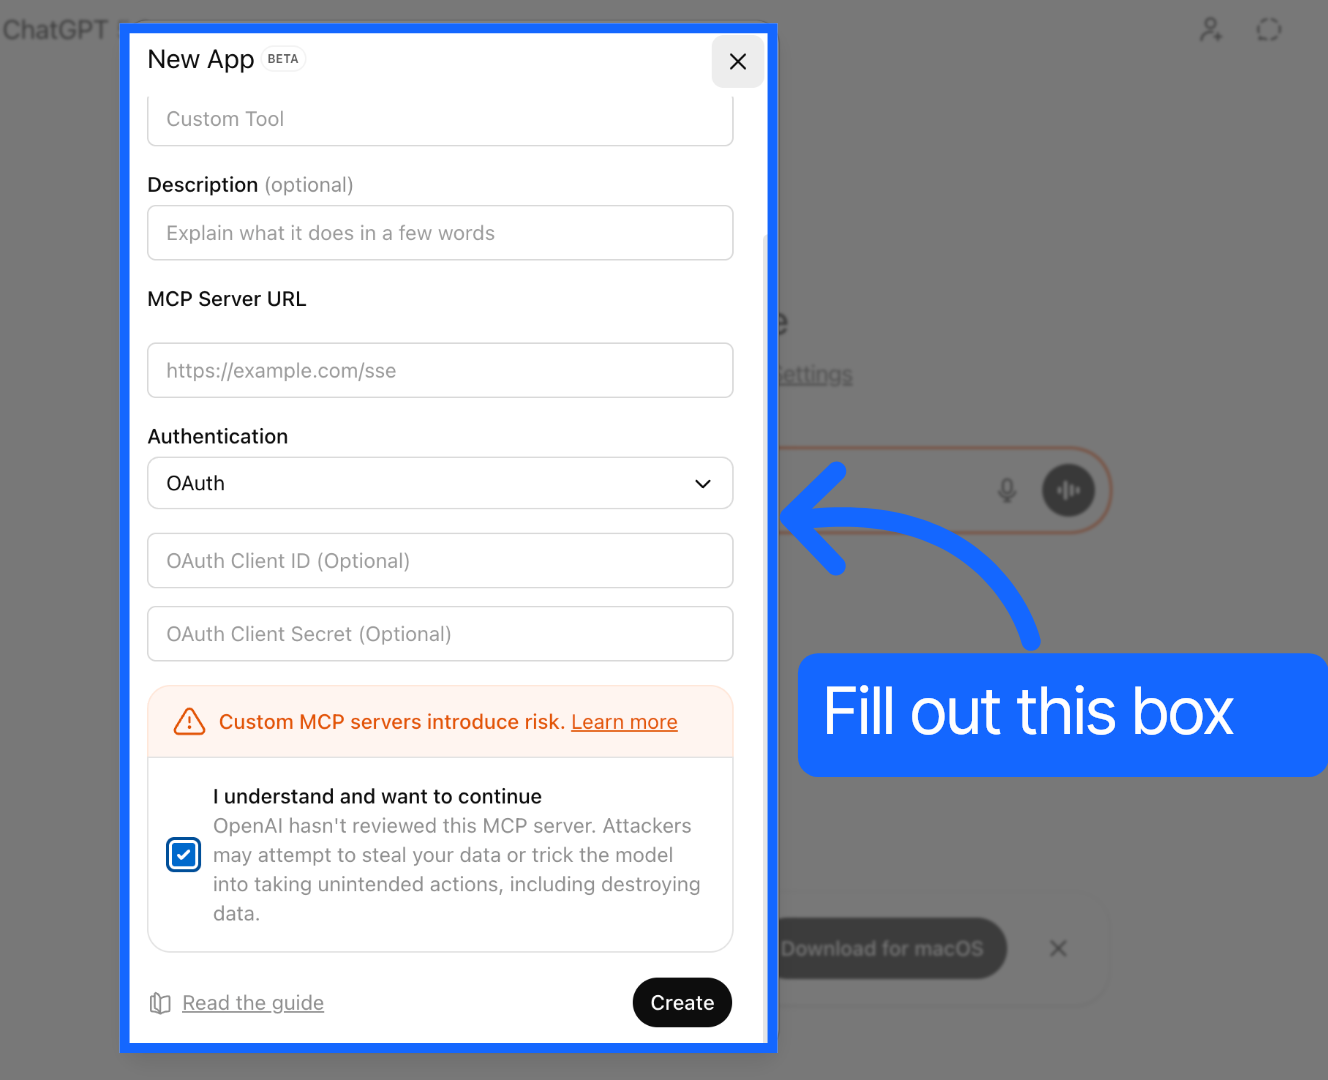
Congratulations, the connector to the MCP server is now created. To access the Paramify MCP
server within a conversation follow the steps below:
1. Open a new chat within ChatGPT (Ensure you are still in developer mode).
2. Click the + near the message entry box, and click “More”.
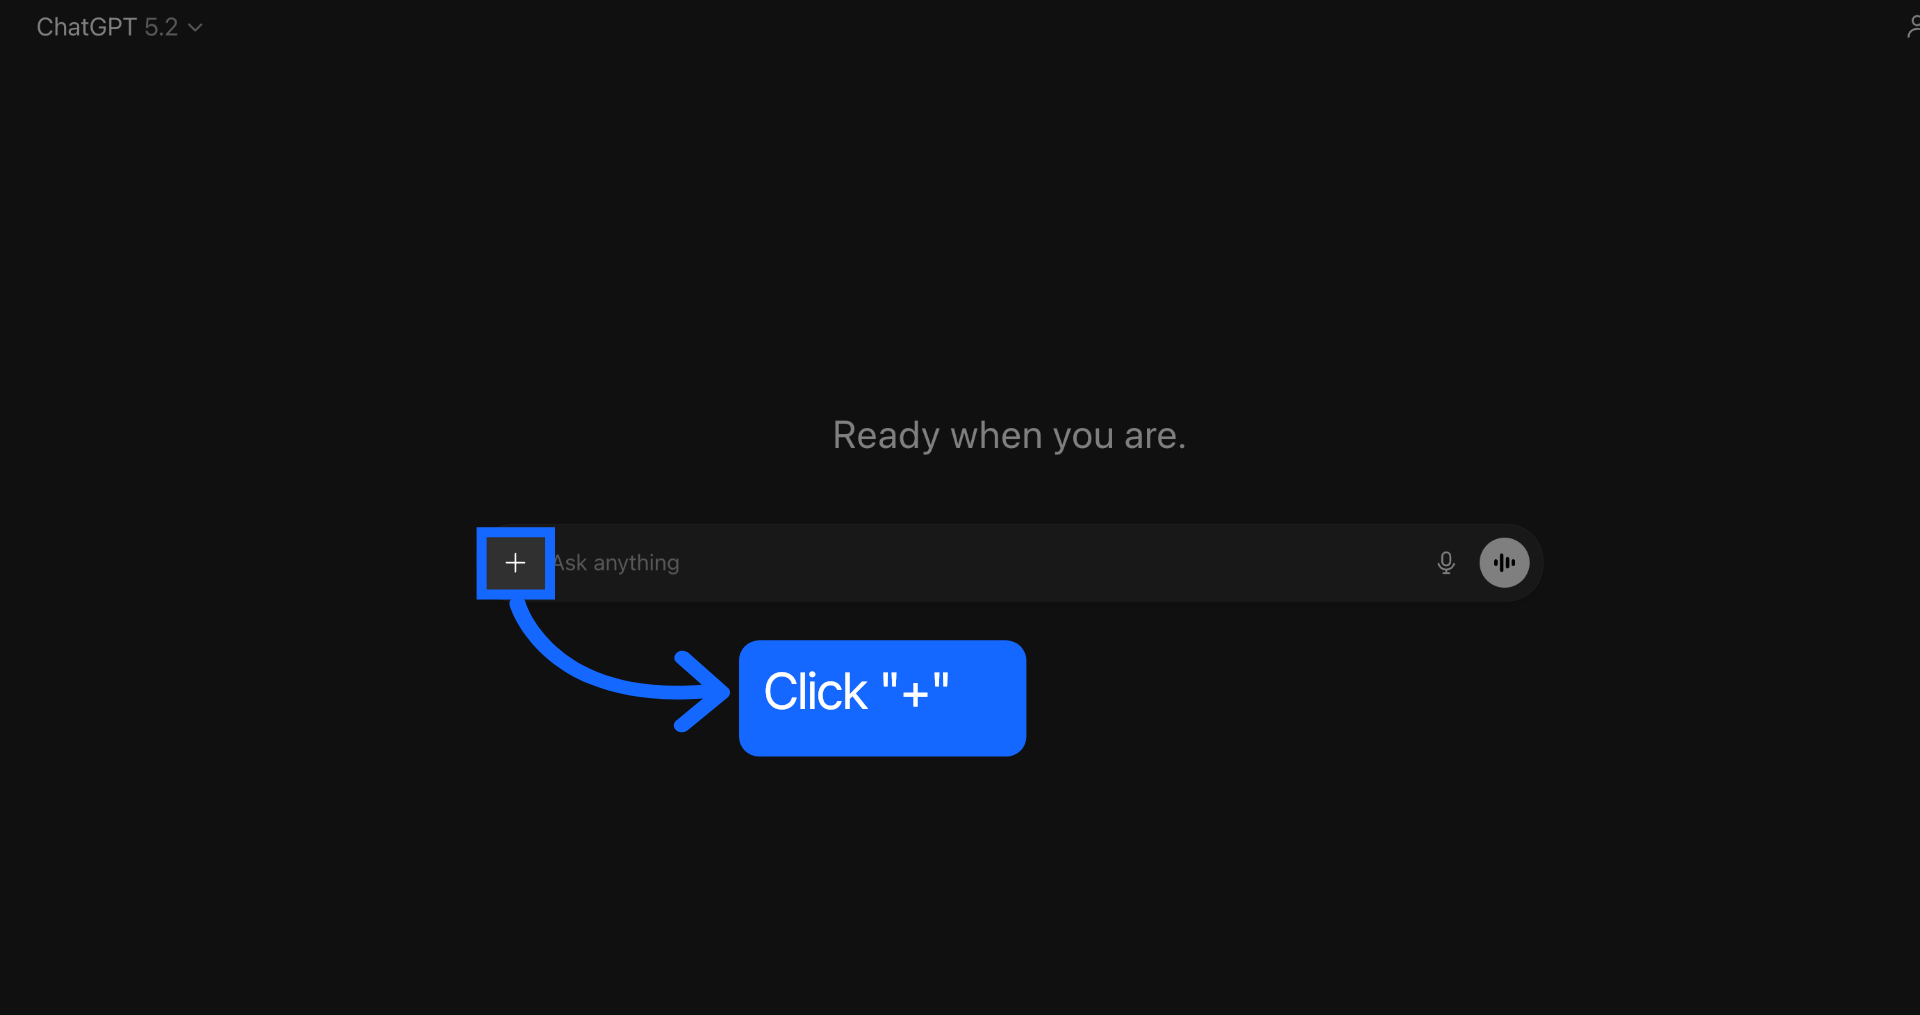
- Select the Paramify MCP Connector to add it to the conversation context.
- Send messages to the conversation and model in order to invoke the MCP server.
ChatGPT will display tool calls in the UI for accuracy and review.
VS Code
1. Open the VS Code application.
2. Enter “>MCP: Add Server” into the search bar and hit enter.
3. Select HTTP from the dropdown menu.
4. Enter the URL of the Paramify MCP server (eg. https://app.paramify.com/mcp/paramify)
and hit enter.
5. Enter a desired name as the Server ID and hit enter.
6. In the generated .json file, enter the following JSON object, replacing the placeholder
text with actual values.
{
    "servers": {
          "<Desired Name>": {
                "type": "http",
                "url": "<URL>",
                "headers": {
                     "Authorization": "Bearer <API Key>"
                }
            }
         }
     }
7. Enter “>MCP: List Servers” into the search bar and hit enter.
8. Select your MCP server from the list in the dropdown (in this example, the server is
called “paramify”)
9. Select “Start Server” from the dropdown menu.
Congratulations, the MCP server has been successfully started and connected to. Open a chat
in VS Code to begin asking questions to the MCP server.
Data Privacy
When using an MCP Server you are sharing data with the A.I. model of your choice. As such,
please consider the privacy and security implications of sharing data with an A.I. model. Some
AI models will train and retain your data.
Claude (from Anthropic) and Cursor (from Anysphere) both have privacy settings that govern
their use of and potential training on your data. Paramify MCP server functions with any LLM of
your choice include a self-hosted LLM for maximum data privacy.
Claude Desktop: Settings > Privacy
Cursor: Settings > General > Privacy > Privacy Mode: Enabled (Code Remains Private)
ChatGPT: Profile Icon > Settings > Data Controls > Turn off “Improve the Model for Everyone”
VS Code: Settings > Application > Telemetry
Telemetry Settings determine how much information is sent to Microsoft for the purpose of
improving the product.
Comments
0 comments
Please sign in to leave a comment.